Converting the jQuery Mobile Calculator to PhoneGap
PhoneGap, now known as Apache Cordova, makes it amazingly easy to turn your jQuery Mobile web application into a mobile device application. So let me show you how to turn the JQM Calculator into an Android app. I am not going to cover how to set up the Android SDK and Eclipse, that is way too much work plus there are plenty of tutorials already covering that. Instead we will start by assuming that you have the Android SDK set up, have the JQM Calculator code available, and have downloaded the latest version of PhoneGap. By the time we are finished you will have a working Android application.
(In case you missed the post about creating a jQuery Mobile calculator, here's the link: jQuery Mobile Calculator )
(In case you missed the post about creating a jQuery Mobile calculator, here's the link: jQuery Mobile Calculator )
Create an Android Project
We begin by a creating a normal Android project. Start up Eclipse and choose File > New > Android Project. Give your project a name. I chose PhoneGapCalculator for mine. Then choose your Android version. I chose Android 2.2. And finally set your package name. At this point you have a regular Android project nothing special here.
PhoneGap-ize The Project
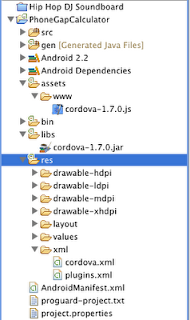
 Now we start adding all of things necessary to PhoneGap-ize the project. Begin by adding a libs folder to the root of your project. Be careful not to add it to any existing folder. Then add a www folder to the existing assets folder. If for some reason the assets folder doesn't exist, create it and then add the www folder to it.
If you haven't already unzipped the PhoneGap zip file, please do so now. Find the android folder. It will be under the lib folder. You need to copy the cordova-1.7.0.jar file to your projects libs folder. Then the cordova-1.7.0.js file to the www folder. And finally we need to copy the entirety of the xml folder to the res folder. Remember to copy these files and folders and don't move them. You will need them for other projects in the future. Your project should look similar to the image.
Fix the Build
Now we need to modify the generated Android source code to make it a PhoneGap app. Expand the src folder until you reach the java file, mine is named PhoneGapCalculatorActivity.java. Near the top of the file below the import lines, add the following line:
import org.apache.cordova.*;
public class PhoneGapCalculatorActivity extends Activity {
To read as follows:
public class PhoneGapCalculatorActivity extends DroidGap {
And finally replace the line:
setContentView();
With the following line:
super.loadUrl("file:///android_asset/www/index.html");
Now lets copy our calculator files into the project. All of your CSS, HTML, and JavaScript files go into the www folder. So we simply copy the entire contents of the JQMCalculator project to the www folder. Please note: PhoneGap works with the project structure the way that it is, no need to flatten folders.
Once the files are copied, the app will actually run, but let's be neat and fix an issue. The JQMCalculator project includes code to hide the URL bar on Android. In a PhoneGap app, that isn't necessary. So we need to delete hideAddressBar.js file. Then remove all references to it in the code. In the index.html file delete the hideAddressBar.js script tag.
RocknCoder.Events = function () {
$("div[data-rockncoder-jspage]
'pagebeforecreate pagecreate pagebeforeload pagebeforeshow pageshow pagebeforechange pagechange pagebeforehide pagehide pageinit',
RocknCoder.Pages.Kernel).on(
"pageinit", RocknCoder.hideAddressBar);
}();
With the following:
RocknCoder.Events = function () {
$("div[data-rockncoder-jspage]
'pagebeforecreate pagecreate pagebeforeload pagebeforeshow pageshow pagebeforechange pagechange pagebeforehide pagehide pageinit',
RocknCoder.Pages.Kernel);
}();
That's all it takes to turn your jQuery Mobile web app into an Android app using PhoneGap.


